
در این مقاله می خواهیم درمورد استفاده از احرازهویت گوگل در اپلیکیشن Node.js صحبت کنیم. برای شروع کار شما به یک پروژه اولیه node بهمراه پکیج ها و مدل ها و view های اولیه نیاز دارید.
پس از این ما نیاز داریم اپلیکیشن گوگل رو بهمراه چهار فایل مختلف بسازیم :
- config/auth.js - ساخت اپ گوگل, آیدی کلاینت و Client Secret
- config/passport.js - پیکربندی استراتژی گوگل پاسپورت
- app/routes.js - ساخت مسیرها
- views/ - بروزرسانی view ها
ساخت اپلیکیشن گوگل
جایی که باید اپلیکیشن گوگل ساخته بشه رو در Cloud API Console میشه پیدا کرد. اپلیکیشن ها رو میتونید در مسیر Project > APIs & auth پیدا کنید.
بیایید اپلیکیشن مون رو با مسیر درست URL بصورت زیر بسازیم :
http://localhost:8080/auth/google/callback
اگر گوگل localhost رو قبول نکرد از 127.0.0.1 استفاده کنید.
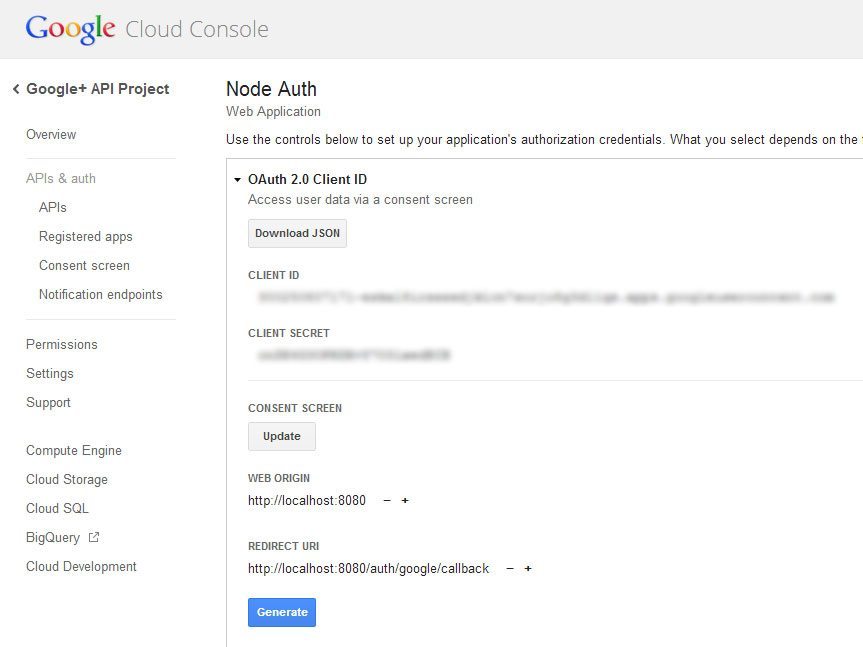
حالا Client ID و Client Secret رو به فایل auth.js اضافه کنید تا اپلیکیشن کدهای امنیتی برای احراز هویت گوگل رو داشته باشه.
// config/auth.js

// expose our config directly to our application using module.exports
module.exports = {

    'facebookAuth' : {
        'clientID'      : 'your-secret-clientID-here', // your App ID
        'clientSecret'  : 'your-client-secret-here', // your App Secret
        'callbackURL'   : 'http://localhost:8080/auth/facebook/callback'
    },

    'twitterAuth' : {
        'consumerKey'       : 'your-consumer-key-here',
        'consumerSecret'    : 'your-client-secret-here',
        'callbackURL'       : 'http://localhost:8080/auth/twitter/callback'
    },

    'googleAuth' : {
        'clientID'      : 'your-secret-clientID-here',
        'clientSecret'  : 'your-client-secret-here',
        'callbackURL'   : 'http://localhost:8080/auth/google/callback'
    }

};
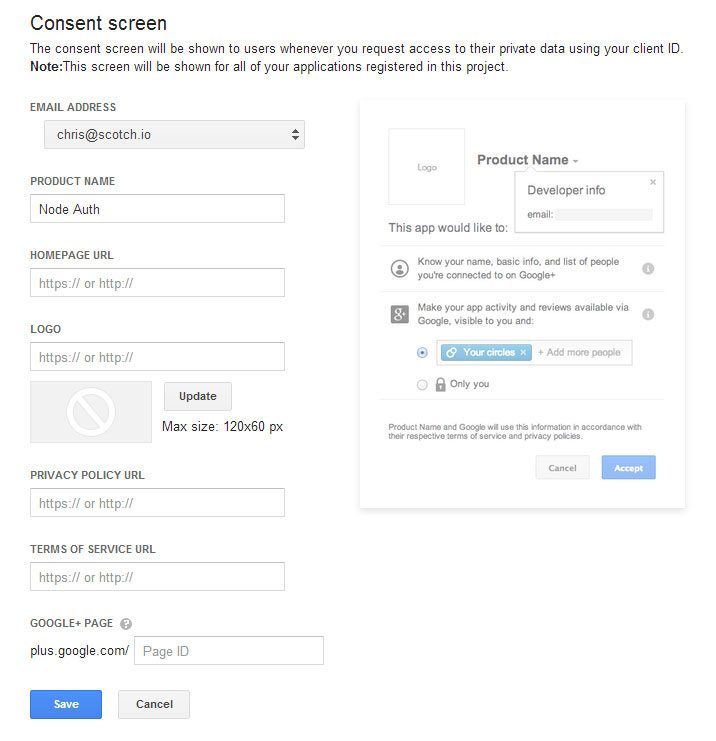
سفارشی سازی صفحه ورود گوگل
گوگل به شما اجازه میده تا صفحه ورود پیشفرض رو سفارشی کنید و مثلا لوگو و متن خودتون رو قرار بدید. این در همان فایلی که Client ID و Client Secret رو وارد کردید, قرار داره. این قابلیت زیر Consent Screen هست.
این هم صفحه سفارشی سازی :
پیکربندی config/passport.js
ما از پکیج passport-google-oauth برای احراز هویت توسط OAuth2 استفاده می کنیم.
این هم پیکربندی های لازم برای passport.js :
// config/passport.js

// load all the things we need
var LocalStrategy    = require('passport-local').Strategy;
var FacebookStrategy = require('passport-facebook').Strategy;
var TwitterStrategy  = require('passport-twitter').Strategy;
var GoogleStrategy = require('passport-google-oauth').OAuth2Strategy;

// load up the user model
var User       = require('../app/models/user');

// load the auth variables
var configAuth = require('./auth');

module.exports = function(passport) {

    // used to serialize the user for the session
    passport.serializeUser(function(user, done) {
        done(null, user.id);
    });

    // used to deserialize the user
    passport.deserializeUser(function(id, done) {
        User.findById(id, function(err, user) {
            done(err, user);
        });
    });

    // code for login (use('local-login', new LocalStategy))
    // code for signup (use('local-signup', new LocalStategy))
    // code for facebook (use('facebook', new FacebookStrategy))
    // code for twitter (use('twitter', new TwitterStrategy))

    // =========================================================================
    // GOOGLE ==================================================================
    // =========================================================================
    passport.use(new GoogleStrategy({

        clientID        : configAuth.googleAuth.clientID,
        clientSecret    : configAuth.googleAuth.clientSecret,
        callbackURL     : configAuth.googleAuth.callbackURL,

    },
    function(token, refreshToken, profile, done) {

        // make the code asynchronous
        // User.findOne won't fire until we have all our data back from Google
        process.nextTick(function() {

            // try to find the user based on their google id
            User.findOne({ 'google.id' : profile.id }, function(err, user) {
                if (err)
                    return done(err);

                if (user) {

                    // if a user is found, log them in
                    return done(null, user);
                } else {
                    // if the user isnt in our database, create a new user
                    var newUser          = new User();

                    // set all of the relevant information
                    newUser.google.id    = profile.id;
                    newUser.google.token = token;
                    newUser.google.name  = profile.displayName;
                    newUser.google.email = profile.emails[0].value; // pull the first email

                    // save the user
                    newUser.save(function(err) {
                        if (err)
                            throw err;
                        return done(null, newUser);
                    });
                }
            });
        });

    }));

};
حالا ما استراتژی گوگل رو که ابتدا بر اساس google.id بین کاربران جستجو میکنه و با profile.id مطابقت میده و درنهایت از گوگل برمی گرده, عمل کردیم.
حالا بیایید مسیرها رو برای تست این استراتژی بسازیم :
ساخت مسیرها app/routes.js
ما دو مسیر اضافه می کنیم :
auth/google : که کاربرمون رو به احراز هویت گوگل هدایت می کنه.
auth/google/callback : که گوگل کاربرمون رو با توکن و پروفایل برمی گردونه.
// app/routes.js

module.exports = function(app, passport) {

    // route for home page
    app.get('/', function(req, res) {
        res.render('index.ejs'); // load the index.ejs file
    });

    // route for login form
    // route for processing the login form
    // route for signup form
    // route for processing the signup form

    // route for showing the profile page
    app.get('/profile', isLoggedIn, function(req, res) {
        res.render('profile.ejs', {
            user : req.user // get the user out of session and pass to template
        });
    });

    // route for logging out
    app.get('/logout', function(req, res) {
        req.logout();
        res.redirect('/');
    });

    // facebook routes
    // twitter routes

    // =====================================
    // GOOGLE ROUTES =======================
    // =====================================
    // send to google to do the authentication
    // profile gets us their basic information including their name
    // email gets their emails
    app.get('/auth/google', passport.authenticate('google', { scope : ['profile', 'email'] }));

    // the callback after google has authenticated the user
    app.get('/auth/google/callback',
            passport.authenticate('google', {
                    successRedirect : '/profile',
                    failureRedirect : '/'
            }));

};

// route middleware to make sure a user is logged in
function isLoggedIn(req, res, next) {

    // if user is authenticated in the session, carry on
    if (req.isAuthenticated())
        return next();

    // if they aren't redirect them to the home page
    res.redirect('/');
}
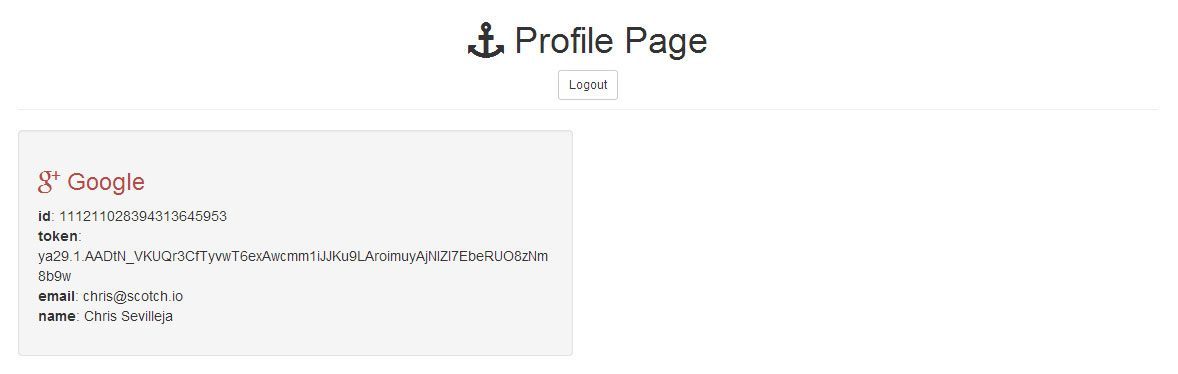
وقتی کاربر احراز هویت شد, به صفحه ی پروفایلش هدایت میشه. آخرین چیزی که ما باید انجام بدیم اینه که اطلاعات کاربر رو نمایش بدیم.
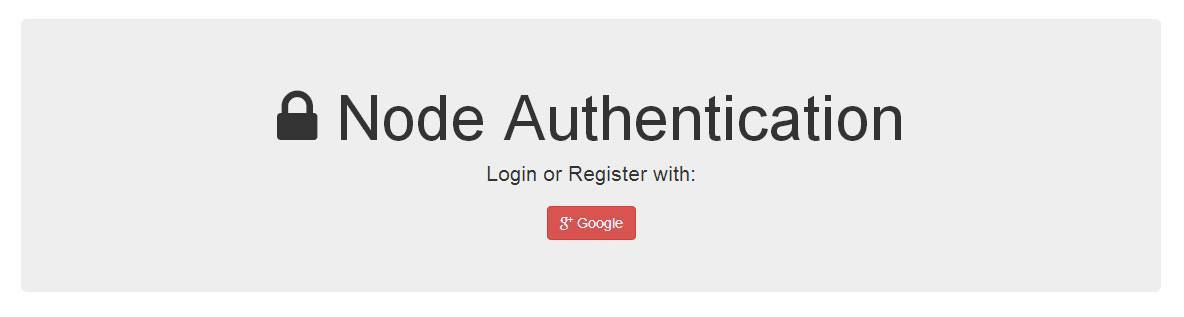
دکمه ورود گوگل views/index.ejs
<!-- views/index.ejs -->

<!doctype html>
<html>
<head>
    <title>Node Authentication</title>
    <link rel="stylesheet" href="//netdna.bootstrapcdn.com/bootstrap/3.0.2/css/bootstrap.min.css"> <!-- load bootstrap css -->
    <link rel="stylesheet" href="//netdna.bootstrapcdn.com/font-awesome/4.0.3/css/font-awesome.min.css"> <!-- load fontawesome -->
    <style>
        body        { padding-top:80px; }
    </style>
</head>
<body>
<div class="container">

    <div class="jumbotron text-center">
        <h1><span class="fa fa-lock"></span> Node Authentication</h1>

        <p>Login or Register with:</p>

        <a href="/auth/google" class="btn btn-danger"><span class="fa fa-google-plus"></span> Google</a>

    </div>

</div>
</body>
</html>
صفحه ی پروفایل views/profile.ejs
وقتی کاربر ثبت نام میشه, به دیتابیس ما اضافه میشه. بیایید اطلاعات کاربر رو نمایش بدیم :
<!-- views/profile.ejs -->
<!doctype html>
<html>
<head>
    <title>Node Authentication</title>
    <link rel="stylesheet" href="//netdna.bootstrapcdn.com/bootstrap/3.0.2/css/bootstrap.min.css">
    <link rel="stylesheet" href="//netdna.bootstrapcdn.com/font-awesome/4.0.3/css/font-awesome.min.css">
    <style>
        body        { padding-top:80px; word-wrap:break-word; }
    </style>
</head>
<body>
<div class="container">

    <div class="page-header text-center">
        <h1><span class="fa fa-anchor"></span> Profile Page</h1>
        <a href="/logout" class="btn btn-default btn-sm">Logout</a>
    </div>

    <div class="row">

        <!-- GOOGLE INFORMATION -->
        <div class="col-sm-6">
            <div class="well">
                <h3 class="text-danger"><span class="fa fa-google-plus"></span> Google</h3>

                    <p>
                        <strong>id</strong>: <%= user.google.id %><br>
                        <strong>token</strong>: <%= user.google.token %><br>
                        <strong>email</strong>: <%= user.google.email %><br>
                        <strong>name</strong>: <%= user.google.name %>
                    </p>

            </div>
        </div>

    </div>

</div>
</body>
</html>
حالا ما صفحه پروفایل کاربر هم داریم :


دیدگاه و پرسش
در حال دریافت نظرات از سرور، لطفا منتظر بمانید
در حال دریافت نظرات از سرور، لطفا منتظر بمانید