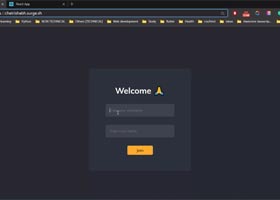
در این لینک یک برنامه چت که قرار است آن را بسازیم آورده شده است.
همچنین در گیتهاب میتوانید به کدهای بکاند و فرانتاند آن دسترسی داشته باشید.
بنابراین ممکن است از خود بپرسید که چگونه برنامههایی مانند واتساپ و تلگرام میگویند که دادههای کاربران در سراسر شبکه رمزگذاری شده است.
این بدان معناست که تمام پیامهای ذخیره شده در پایگاه داده آنها رمزگذاری شده است، بنابراین حتی اگر شخص ثالثی سعی کند به پیامها دسترسی داشته باشد، هنگام رسیدن به مقصد، پیام گرفته شده به صورت رمزگذاری شده خواهد بود.
در این مقاله قصد داریم به شما نشان دهیم که چگونه E2E ساده بسازید که به اندازه واتساپ امن نخواهد بود، اما با این وجود بهتر از هیچ است.
برای رمزگذاری و رمزگشایی پیامهای خود از یک کلید مخفی استفاده خواهیم کرد، بنابراین از ساختار رمزگذاری متقارن برخوردار خواهیم بود.
توجه داشته باشید، واتساپ از تکنیک Diffie-Helman برای دستیابی به رمزگذاری نامتقارن استفاده میکند. این یکی از آن تکنیکهایی است که میتواند برای تولید امنترین برنامههای چت مورد استفاده قرار گیرد. اگر میخواهید در این مورد بیشتر بدانید، لطفا به این لینک مراجعه کنید.
نحوه کار به چه صورت است
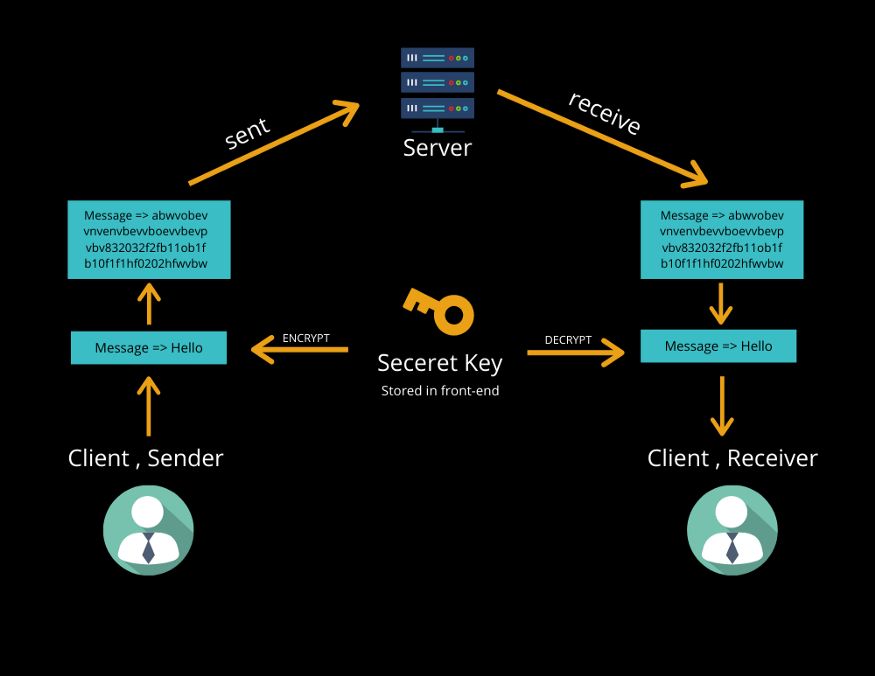
همانطور که در تصویر بالا نشان داده شده است، ما یک کلید مخفی ایجاد خواهیم کرد که در فرانتاند ذخیره میشود (در حال حاضر، من آن را در خود فایل فرانتاند ذخیره میکنم اما برای تولید، شما باید آن را در متغیرهای ENV. سرور خود ذخیره کنید جایی که قسمت فرانتاند خود را مستقر کردهاید).
هر زمان که کاربر پیامی را ارسال میکند، باید آن را با استفاده از پکیج aes256 npm با کلید مخفی شما رمزگذاری کنیم. ما پس از دریافت پیام رمزگذاری شده فرآیند را تکرار خواهیم کرد، اما این بار با استفاده از همان کلید مخفی رمزگشایی میشود.
کد برنامه
بکاند (Node, Express, Socket.io)
ساختار فولدر
Backend
 |- dummyuser.js
 |- server.js
|- package.jsonوابستگیها برای نصب
npm i socket.io express dotenv cors colors
npm i nodemon -d
به dummyuser.js بروید
const users = [];

// Join user to chat
function userJoin(id, username, room) {
  const user = { id, username, room };

  users.push(user);
  console.log(users, "users");

  return user;
}
console.log("user out", users);

// Get current user
function getCurrentUser(id) {
  return users.find((user) => user.id === id);
}

// User leaves chat
function userLeave(id) {
  const index = users.findIndex((user) => user.id === id);

  if (index !== -1) {
    return users.splice(index, 1)[0];
  }
}

module.exports = {
  userJoin,
  getCurrentUser,
  userLeave,
};- در اینجا ما سه تابع ایجاد میکنیم که از کاربر مراقبت خواهند کرد. تابع userjoin() یک کاربر را به کاربران آرایه خالی اضافه میکند.
- User Object از 3 کلید تشکیل شده است: شناسه، نام کاربری و نام اتاق. نام اتاق در واقع مانند "گروه واتساپ" است که به کاربر میگوید متعلق به این اتاق خاص است.
- Getcurrentuser()، شناسه یک کاربر خاص را میگیرد و شی کاربر خود را بر میگرداند.
- هر زمان که کاربر از چت خارج شود (قطع ارتباط) ما با userLeave() که یک شناسه کاربر را میپذیرد و آن شی کاربر را از کاربران آرایه حذف خواهیم کرد تماس خواهیم گرفت.
به server.js بروید
پکیجها و تنظیمات اولیه را وارد کنید.
const express = require("express");
const app = express();
const socket = require("socket.io");
const color = require("colors");
const { getCurrentUser, userLeave, userJoin } = require("./dummyuser");

const port = 8000;


var server = app.listen(
  port,
  console.log(
    `Server is running in ${process.env.NODE_ENV} on port ${process.env.PORT} `
      .yellow.bold
  )
);

const io = socket(server);
در اینجا ما فقط ماژولها و توابع را از dummyuser.js وارد میکنیم و به پورت 8000 گوش میدهیم و سوکت را مقداردهی اولیه میکنیم.
//everything related to io will go here
io.on("connection", (socket) => {
  //when new user join room
  socket.on("joinRoom", ({ username, roomname }) => {
    //* create user
    const user = userJoin(socket.id, username, roomname);
    console.log(socket.id, "=id");
    socket.join(user.room);

    //* emit message to user to welcome him/her
    socket.emit("message", {
      userId: user.id,
      username: user.username,
      text: `Welcome ${user.username}`,
    });

    //* Broadcast message to everyone except user that he has joined
    socket.broadcast.to(user.room).emit("message", {
      userId: user.id,
      username: user.username,
      text: `${user.username} has joined the chat`,
    });
  });

  //when somebody send text
  socket.on("chat", (text) => {
    //* get user room and emit message
    const user = getCurrentUser(socket.id);

    io.to(user.room).emit("message", {
      userId: user.id,
      username: user.username,
      text: text,
    });
  });

  // Disconnect , when user leave room
  socket.on("disconnect", () => {
    // * delete user from users & emit that user has left the chat
    const user = userLeave(socket.id);

    if (user) {
      io.to(user.room).emit("message", {
        userId: user.id,
        username: user.username,
        text: `${user.username} has left the chat`,
      });
    }
  });
});
پس از مقداردهی اولیه سوکت، همه موارد مربوط به سوکتها به این پاسخ مجدد وارد میشوند (”connection , () => “everything will go here).
در اینجا ما دو تابع داریم socket.on ("joinRoom") و socket.on ("chat"). تابع joinRoom تنها در هر زمان ورود کاربر جدید به اتاق اجرا میشود.
همچنین یک پیام خوش آمد گویی به او نشان میدهیم و یک پیام (کاربر جدید اضافه شده است) را برای همه کاربران (به جز خود کاربر تازه وارد شده) منتشر میکنیم.
socket.on(“chat”) قسمت ارسال پیام را اداره میکند.
به علاوه هر زمان که ارتباط کاربر قطع شود، ما پیام "کاربر چت را ترک کرده است" برای همه افراد گروه ارسال خواهیم کرد.
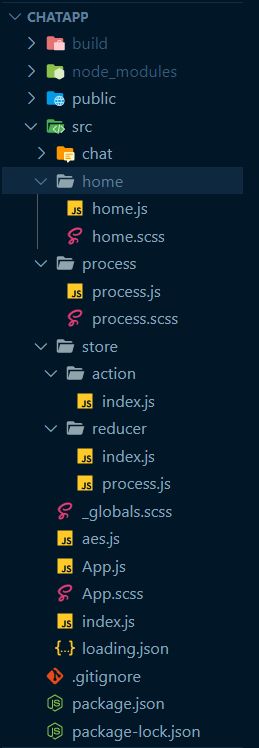
فرانتاند (React, Redux, Socket.io-client, aes256)
ساختار فولدر
وابستگیها برای نصب
npm i node-sass react-lottie react-redux react-router-dom reduxتنظیمات اولیه
import React from "react";
import ReactDOM from "react-dom";
import App from "./App";
import { createStore } from "redux";
import { Provider } from "react-redux";
import rootReducers from "./store/reducer/index";

const store = createStore(rootReducers);
ReactDOM.render(
  <Provider store={store}>
    <App />
  </Provider>,
  document.getElementById("root")
);
در اینجا ما redux را اضافه میکنیم و جداکنندهها را از store/reducer/index/store/action/index.js/. وارد میکنیم.
export const process = (encrypt, text, cypher) => {
  return {
    type: "PROCESS",
    payload: {
      encrypt,
      text,
      cypher,
    },
  };
};
/store/reducer/index.js
import { combineReducers } from "redux";
import { ProcessReducer } from "./process";
const rootReducers = combineReducers({
  ProcessReducer: ProcessReducer,
});
export default rootReducers;
/store/reducer/process.js
export const ProcessReducer = (state = {}, action) => {
  switch (action.type) {
    case "PROCESS":
      return { ...action.payload };

    default:
      return state;
  }
در فایلهای بالا، ما در حال افزودن redux به React App هستیم و فایلی را ایجاد میکنیم به نام "process" که وظیفه ارسال پیام (اعم از ورودی و خروجی) به "aes.js" (مسئول رمزگذاری و رمزگشایی) و دریافت اطلاعات از 'aes.js' به اجزای سازنده ما را دارد.
به App.js بروید
import React from "react";
import Chat from "./chat/chat";
import Process from "./process/process";
import "./App.scss";
import { BrowserRouter as Router, Switch, Route } from "react-router-dom";
import Home from "./home/home";
import io from "socket.io-client";
const socket = io("https://chatapprishabh098.azurewebsites.net");
function Appmain(props) {
  return (
    <React.Fragment>
      <div className="right">
        <Chat
          username={props.match.params.username}
          roomname={props.match.params.roomname}
          socket={socket}
        />
      </div>
      <div className="left">
        <Process />
      </div>
    </React.Fragment>
  );
}
function App() {
  return (
    <Router>
      <div className="App">
        <Switch>
          <Route path="/" exact>
            <Home socket={socket} />
          </Route>
          <Route
          path="/chat/:roomname/:username"
          component={Appmain} />
        </Switch>
      </div>
    </Router>
  );
}

export default App;
در اینجا مسیرها را وارد کردیم و اجزای سازنده، مسیرها و آدرس اینترنتی را وارد کردیم و در حال ارائه کامپوننتها هستیم که مسئول دریافت نام کاربری و نام اتاق هستند.
در مسیر "chat/roomname/username/" در حال ارائه یک جز AppMain هستیم که دو قسمت را برمیگرداند یکی chatbox است و دیگری فرایندی را نشان میدهد که پیام ورودی رمزگذاری شده و پیام رمزگشایی نشان داده میشود.
استایل مورد نیاز App.js و globals.scss را اضافه کنید
App.scss
@import "./globals";
.App {
  width: 100%;
  height: 100vh;
  background-color: $backgroundColor;
  display: flex;
  justify-content: center;
  align-items: center;
  .right {
    flex: 2;
  }
  .left {
    flex: 1;
}globals.scss_
@import url("https://fonts.googleapis.com/css2?family=Muli:ital,wght@0,200;0,300;0,400;0,500;0,600;0,700;0,800;0,900;1,200;1,300;1,400;1,500;1,600;1,700;1,800;1,900&display=swap");
* {
  margin: 0 auto;
  padding: 0;
  box-sizing: border-box;
  color: white;
  font-family: "Muli", sans-serif;
}

$backgroundColor: #282b34;
$greyColor: #2d343e;
$redColor: #ff1e56;
$yellowColor: #ffac41;
به /home/home.js بروید
import React, { useState } from "react";
import "./home.scss";
import { Link } from "react-router-dom";

function Homepage({ socket }) {
  const [username, setusername] = useState("");
  const [roomname, setroomname] = useState("");

  const sendData = () => {
    if (username !== "" && roomname !== "") {
      socket.emit("joinRoom", { username, roomname });
    } else {
      alert("username and roomname are must !");
    }
  };

  return (
    <div className="homepage">
      <h1>Welcome ?</h1>
      <input
        placeholder="Enter your username"
        value={username}
        onChange={(e) => setusername(e.target.value)}
      ></input>
      <input
        placeholder="Enter room name"
        value={roomname}
        onChange={(e) => setroomname(e.target.value)}
      ></input>
      <Link to={`/chat/${roomname}/${username}`}>
        <button onClick={sendData}>Join</button>
      </Link>
    </div>
  );
}

export default Homepage;
در اینجا از کاربر (نام کاربر و اتاق) ورودی میگیریم و socket.emit ("joinRoom") را فراخوانی میکنیم که نام کاربری و نام اتاق را میفرستد و "joinRoom" را در قسمت بکاند ما فعال میکند که باعث اضافه شدن کاربر به اتاق و انتشار پیام آن میشود. همانطور که در بالا در بخش بکاند بحث شد.
استایلی را به home.js اضافه کنید
Home.scss
@import "../globals";
.homepage {
  width: 400px;
  height: 400px;
  background-color: $greyColor;
  display: flex;
  flex-direction: column;
  padding: 2rem;
  justify-content: space-evenly;
  border-radius: 5px;
  input {
    height: 50px;
    width: 80%;
    text-decoration: none;
    background-color: #404450;
    border: none;
    padding-left: 1rem;
    border-radius: 5px;
    &:focus {
      outline: none;
    }
  }
  button {
    font-size: 1rem;
    padding: 0.5rem 1rem 0.5rem 1rem;
    width: 100px;
    border: none;
    background-color: $yellowColor;
    border-radius: 5px;

    color: black;
    &:hover {
      cursor: pointer;
    }
  }
}
به /chat/chat.js بروید
import React, { useState, useEffect, useRef } from "react";
import "./chat.scss";
import { DoDecrypt, DoEncrypt } from "../aes.js";
import { useDispatch } from "react-redux";
import { process } from "../store/action/index";

function Chat({ username, roomname, socket }) {
  const [text, setText] = useState("");
  const [messages, setMessages] = useState([]);

  const dispatch = useDispatch();

  const dispatchProcess = (encrypt, msg, cipher) => {
    dispatch(process(encrypt, msg, cipher));
  };

  useEffect(() => {
    socket.on("message", (data) => {
      //decypt
      const ans = DoDecrypt(data.text, data.username);
      dispatchProcess(false, ans, data.text);
      console.log(ans);
      let temp = messages;
      temp.push({
        userId: data.userId,
        username: data.username,
        text: ans,
      });
      setMessages([...temp]);
    });
  }, [socket]);

  const sendData = () => {
    if (text !== "") {
      //encrypt here
      const ans = DoEncrypt(text);
      socket.emit("chat", ans);
      setText("");
    }
  };
  const messagesEndRef = useRef(null);

  const scrollToBottom = () => {
    messagesEndRef.current.scrollIntoView({ behavior: "smooth" });
  };

  useEffect(scrollToBottom, [messages]);

  console.log(messages, "mess");

  return (
    <div className="chat">
      <div className="user-name">
        <h2>
          {username} <span style={{ fontSize: "0.7rem" }}>in {roomname}</span>
        </h2>
      </div>
      <div className="chat-message">
        {messages.map((i) => {
          if (i.username === username) {
            return (
              <div className="message">
                <p>{i.text}</p>
                <span>{i.username}</span>
              </div>
            );
          } else {
            return (
              <div className="message mess-right">
                <p>{i.text} </p>
                <span>{i.username}</span>
              </div>
            );
          }
        })}
        <div ref={messagesEndRef} />
      </div>
      <div className="send">
        <input
          placeholder="enter your message"
          value={text}
          onChange={(e) => setText(e.target.value)}
          onKeyPress={(e) => {
            if (e.key === "Enter") {
              sendData();
            }
          }}
        ></input>
        <button onClick={sendData}>Send</button>
      </div>
    </div>
  );
}
export default Chat;
در اینجا از کاربر ورودی میگیریم و دادهها را برای پردازش عملیاتی منتقل میکنیم که آن را به تابع aes برای رمزگذاری میفرستد و سپس همان را به ("chat") socket.on منتشر میکند. هر زمان که پیامی دریافت میشود، آن را دوباره ارسال میکنیم به تابع aes اما این بار برای رمزگشایی.
استایلی را برای chat اعمال کنید
chat.scss
@import "../globals";
@mixin scrollbars(
  $size,
  $foreground-color,
  $background-color: mix($foreground-color, white, 50%)
) {
  // For Google Chrome
  &::-webkit-scrollbar {
    width: $size;
    height: $size;
  }

  &::-webkit-scrollbar-thumb {
    background: $foreground-color;
    border-radius: 10px;
  }

  &::-webkit-scrollbar-track {
    background: $background-color;
    border-radius: 10px;
  }

  // For Internet Explorer
  & {
    scrollbar-face-color: $foreground-color;
    scrollbar-track-color: $background-color;
  }
}
.chat {
  width: 400px;
  height: 600px;
  background-color: $greyColor;
  padding: 1rem;
  display: flex;
  flex-direction: column;
  justify-content: space-between;
  .user-name {
    text-align: start;
    width: 100%;
    h2 {
      font-weight: 300;
      border-bottom: 1px solid rgba(255, 255, 255, 0.1);
      padding-bottom: 1rem;
    }
  }
  .chat-message {
    height: 70%;
    overflow-y: auto;
    @include scrollbars(5px, $backgroundColor, $yellowColor);
    display: flex;
    flex-direction: column;
    width: 100%;
    align-content: flex-start;

    .message {
      margin-left: 0px;
      max-width: 220px;
      padding-left: 0.5rem;

      p {
        font-size: 1rem;
        background-color: #343841;
        padding: 1rem;
        border-radius: 0px 10px 10px 10px;
        font-weight: 300;
        color: #b4b6be;
      }

      span {
        font-size: 0.6rem;
        font-weight: 200;
        color: #b4b6be;
        padding-left: 0.5rem;
      }
    }
    .mess-right {
      margin-left: auto;
      margin-right: 0px;
      display: flex;
      flex-direction: column;
      max-width: 220px;
      padding-right: 0.5rem;
      p {
        text-align: end;
        border-radius: 10px 0px 10px 10px;
        background-color: $redColor;
        color: white;
      }
      span {
        width: 100%;
        text-align: end;
        padding-left: 0rem;
        padding-right: 0.5rem;
      }
    }
  }

  .send {
    width: 100%;
    height: 50px;
    display: flex;
    input {
      width: 80%;
      text-decoration: none;
      background-color: #404450;
      border: none;
      padding-left: 1rem;
      border-radius: 5px 0px 0px 5px;
      &:focus {
        outline: none;
      }
    }
    button {
      width: 20%;
      border: none;
      background-color: $yellowColor;
      border-radius: 0px 5px 5px 0px;
      &:hover {
        cursor: pointer;
      }
    }
  }
}
به aes.js بروید
var aes256 = require("aes256");

var key = "obvwoqcbv21801f19d0zibcoavwpnq";

export const DoEncrypt = (text) => {
  var encrypted = aes256.encrypt(key, text);
  return encrypted;
};
export const DoDecrypt = (cipher, username) => {
  if (cipher.startsWith("Welcome")) {
    return cipher;
  }

  if (cipher.startsWith(username)) {
    return cipher;
  }

  var decrypted = aes256.decrypt(key, cipher);
  return decrypted;
};
در اینجا در حال وارد کردن aes256 و نوشتن تابعی هستیم که پیام دریافتی را رمزگشایی کرده و پیام خروجی را رمزگذاری میکند.
به process.js بروید (کامپوننت اختیاری)
import React, { useState } from "react";
import Lottie from "react-lottie";
import animationData from "../loading.json";
import { useSelector } from "react-redux";
import "./process.scss";
function Process() {
  const [play, setPlay] = useState(false);

  const state = useSelector((state) => state.ProcessReducer);

  const defaultOptions = {
    loop: true,
    autoplay: true,
    animationData: animationData,
    rendererSettings: {
      preserveAspectRatio: "xMidYMid slice",
    },
  };
  return (
    <div className="process">
      <h5>
        Seceret Key : <span>"obvwoqcbv21801f19d0zibcoavwpnq"</span>
      </h5>
      <div className="incomming">
        <h4>Incomming Data</h4>
        <p>{state.cypher}</p>
      </div>
      <Lottie
        options={defaultOptions}
        height={150}
        width={150}
        isStopped={play}
      />
      <div className="crypt">
        <h4>Decypted Data</h4>
        <p>{state.text}</p>
      </div>
    </div>
  );
}
export default Process;
این فقط یک کامپوننت (ستون سمت راست) است که ما در آن رمزگذاری ورودی را نمایش میدهیم. با استفاده از کلید مخفی پیام رمزگشایی میشود.
استایلی را برای process.js اعمال کنید
@import "../globals";
.process {
  width: 500px;
  min-height: 550px;
  margin-right: 10rem;
  display: flex;
  flex-direction: column;
  justify-content: space-evenly;
  align-items: center;
  padding: 2rem;
  h5 {
    margin-bottom: 2rem;
    font-weight: 300;
    color: rgba(255, 255, 255, 0.4);
    span {
      color: yellow;
    }
  }
  .incomming {
    width: 100%;
    h4 {
      color: rgba(255, 255, 255, 0.4);
      font-weight: 300;
    }
    p {
      margin-top: 0.5rem;
      background-color: rgba(0, 0, 0, 0.4);
      padding: 1.2rem;
      font-size: 1rem;
      border-radius: 5px;
      overflow: hidden;
      white-space: nowrap;
      text-overflow: ellipsis;
    }
  }
  .crypt {
    width: 100%;
    h4 {
      color: rgba(255, 255, 255, 0.4);
      font-weight: 300;
    }
    p {
      margin-top: 0.5rem;
      background-color: rgba(0, 0, 0, 0.4);
      padding: 1.2rem;
      font-size: 1rem;
      border-radius: 5px;
    }
  }
}
اساسا process.js مسئول نمایش پیامهای رمزگذاری شده و رمزگشایی شده است.
همین! سرانجام یک برنامه E2E چت به صورت real-time ساختهایم. حالا فقط برنامه ریاکت را با نوشتن npm start در ترمینال شروع کرده و به localhost:3000 بروید. نام کاربری و نام اتاق را بنویسید و همچنین سربرگ دیگری را باز کنید و به localhost:3000 بروید. نام خود را بنویسید و همان نام اتاق را که قبلا در سربرگ اول نوشتهاید وارد کنید.
اگر این مقاله برایتان مفید بوده، حتما نظر خود را در بخش زیر با ما در میان بگذارید. همچنین سوالات خود را بپرسید، خوشحال میشویم به آنها پاسخ دهیم.


دیدگاه و پرسش
در حال دریافت نظرات از سرور، لطفا منتظر بمانید
در حال دریافت نظرات از سرور، لطفا منتظر بمانید